
Snailsoft
∞ and beyond!
Staff Member
Moderator
SB Mod Squad ⭐
✔ Approved Releaser
Active User
Member for 2 years
- Gender
- Not specified
- Device
- 6502
- Country
- Canada
Gathered from various resoureces, translated, and coalated here. Links available at the end of the document.
Google replaced its long-standing integrity protection with the Safetynet infrastructure in 2024, with a new structure called PairIP. When you enter the Safetynet documentation page, you will see the warning “Warning: The SafetyNet Attestation API is deprecated and has been replaced by the Play Integrity API. Learn more.”
So what is this PairIP? What are the differences between it and Safetynet? Let’s take a look at this.
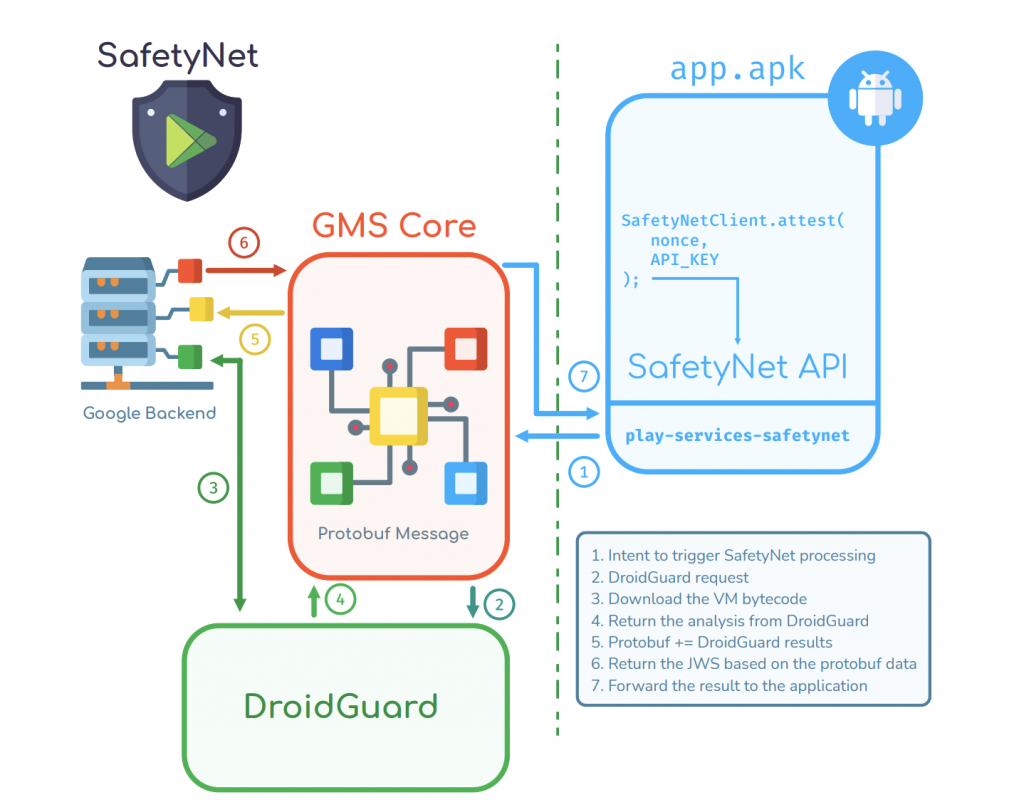
0x00: Safetynet Workflow
SafetyNet is a security mechanism that includes a virtual machine module called DroidGuard, which is part of the Google Mobile Services (GMS) package. This VM executes specific bytecode to analyze the device’s security status. The client application generates a nonce token, which is included in the attestation request sent via the Attestation API. The response from this API provides two parameters: ctsProfileMatch and basicIntegrity, which help assess the device’s compatibility and integrity.

This image is taken from Rhomain Thomas’ speech at the BH conference
CTS Profile Match: bootloader unlocked?, custom ROM?, uncertified device? etc..
Basic Integrity: is an emulator?, rooted device?, any agent injected? (frida etc..) etc..
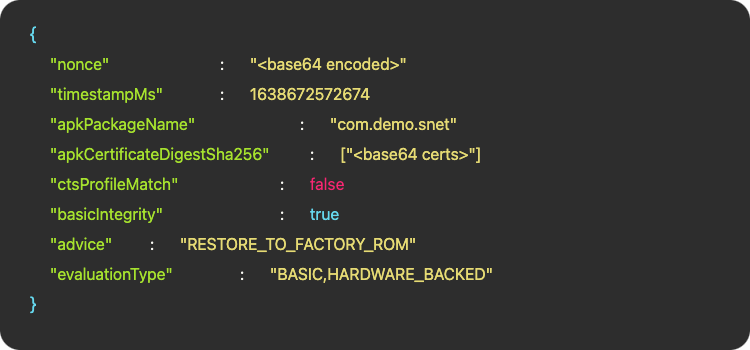
At the end of the security checks performed by DroidGuard, a Protobuf message is generated. This message contains many parameters related to the device’s security checks. The ctsProfileMatch and basicIntegrity parameters mentioned above are also generated as a result of these checks. After all the checks are completed, Google’s backend issues a JWS token that includes all this data.
JWS token parameters in short, safetynet works like this:
SafetyNet’s Detection Logic
goodbye to Safetynet, let’s talk a little bit about PairIP.
0x01: PairIP Protection Workflow
PairIP has similar mechanisms to Safetynet as basic checks. It subjects your device to a security check by performing an integrity check on the device. However, unlike Safetynet, it does not require an additional Attestation or a different module.
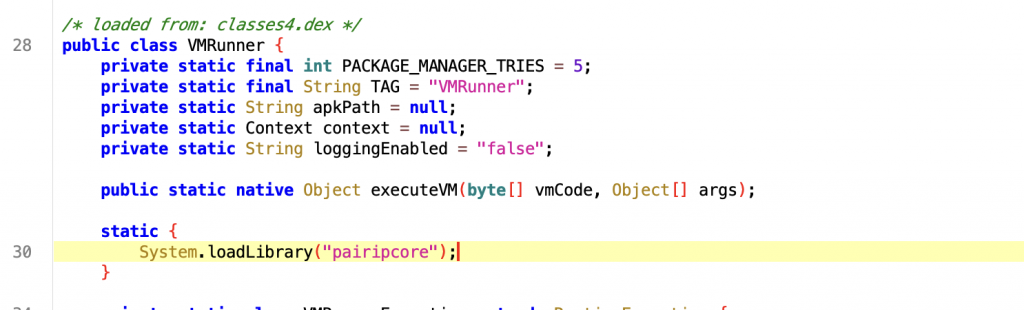
PairIP basically uses a native library to perform integrity checks. This library separates some of the java codes in the project from their own lifecycle and allows them to be executed through the native library.
This library, called libpairipcore.so, is a powerful library that works on a VM basis and uses many anti-tampering techniques. It separates the java bytecodes in the project from the main structure of the project and converts them into bytecodes that will run in its own VM. Instead of running java bytecode directly in the project, some codes are run in this VM developed by Google via pairip’s executeVM() method.
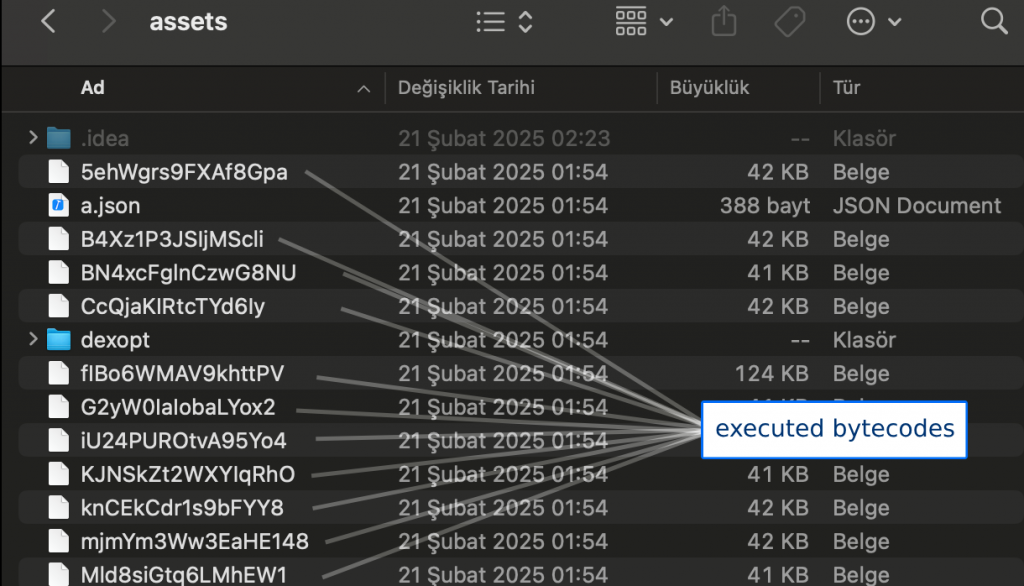
bytecode files in assets/ folder.
These bytecode files in the assets/ folder in your application are converted into meaningful bytecodes by the VM and executed by the executeVM method. This is not a method defined in the executeVM native library. It is stored in JNI_OnLoad via RegisterNatives. and some method calls belonging to the library, important strings and many other things are created at runtime. So , if we want to do a complete analysis and examine the executeVM() method, we will first need to dump the library created at runtime.
So, how did we find the executeVM() method? Let’s take a closer look.
0x02: Introduction to Libpairipcore.so
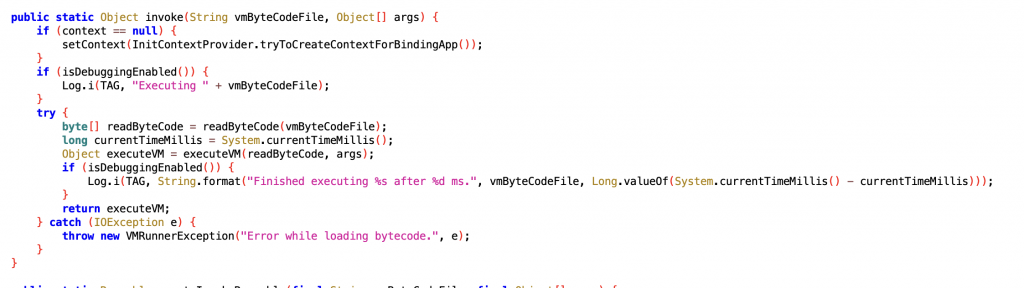
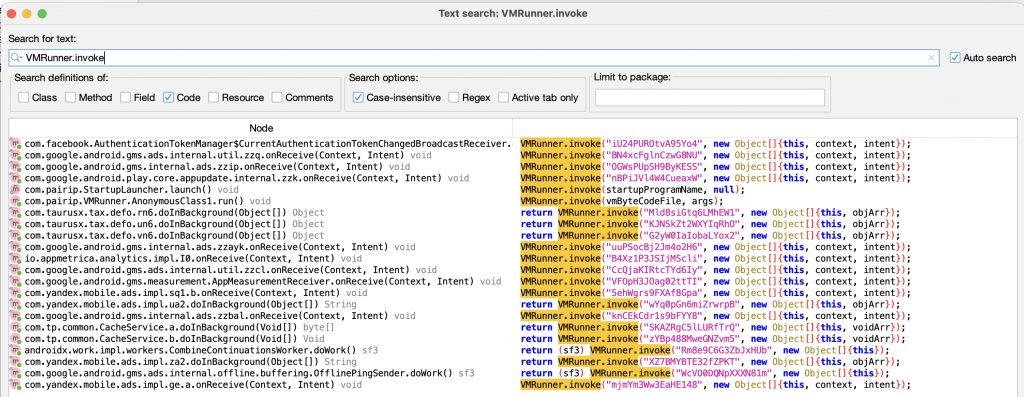
The VMRunner class on the Java side is the main class that manages all the checks that PairIP performs within the application. This class manages all processes such as reading VM bytecodes from the assets/ folder and transferring the read bytecodes to the executeVM() method.
As can be seen, VM bytecodes are read with the readByteCode() method and then the read bytecode is transferred to the executeVM() method. When we look at the call tree of the invoke() method, we can see that there are many calls belonging to many packages.
PairIP splits the code into different parts by adapting the native code to its own VM structure and allows the calls to become more complex. The parameters we see in the invoke() call here correspond to the names of the bytecode files in the assets/ folder.
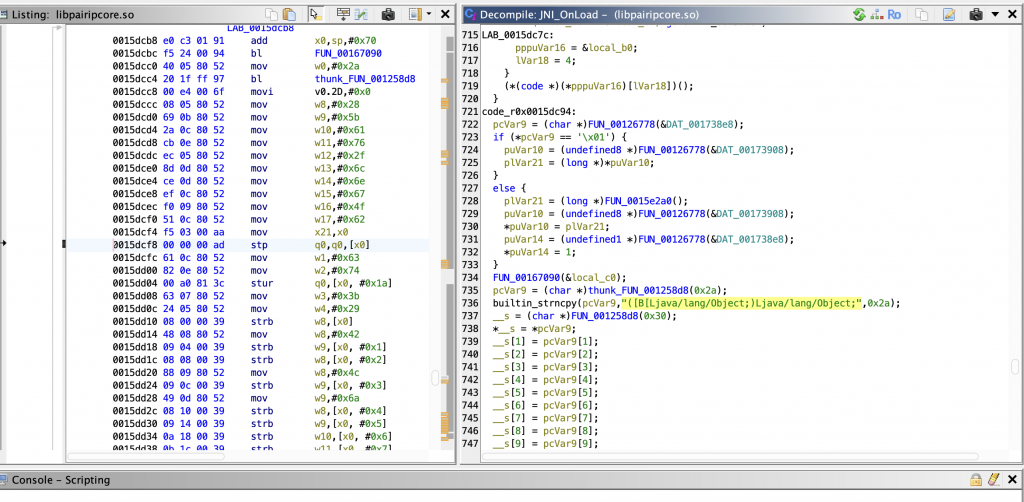
When we look at the codes, we see that the executeVM() method is defined on the native side. And when we examine the library from ghidra, we know that this method is not defined directly, but may have been registered via RegisterNatives.
If you want to take a look at the JNI_OnLoad method to follow the RegisterNatives call, you may not see a direct RegisterNatives call, but you may find some helpful hints.
When you examine it with Ghidra, we can see that there is a field in JNI_OnLoad where a method is defined. When we compare its parameter array with the values we get from Java, we can easily see that it matches the executeVM() method.
Therefore, the registration process of the executeVM() method may be taking place here. In that case, if we find the offset of the RegisterNatives call in the native library, we can reach the executeVM method by following this call.
Everyone can do this in different ways. In my own analysis process, I used Frida’s Stalker API to analyze the instructions more easily and speed up the patch process.
The operations we will do here will be as follows;
we intercept the dlopen method to hook the libpairipcore.so file as soon as it is loaded and run the desired hook method as soon as the loaded library name is equal to the “libpairipcore.so” string.
We simply create our methods using the Stalker API. This structure provides a framework that allows us to intercept all instructions from the moment the application is started. Here we can do instruction-based filtering and hook only the instructions we want. However, seeing the entire flow at the beginning seems like the most logical way to go for me.
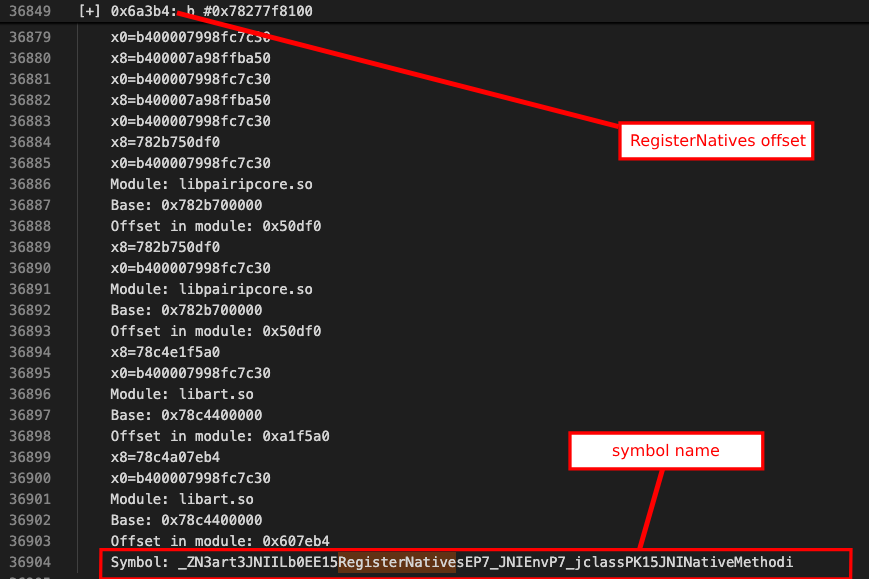
Here, while the instructions are being loaded, we are monitoring the x8 and x0 registers in the same loop. The x0 register allows us to obtain the first parameter passing the function. The x8 register represents the branch target address. If the target offset belongs to a module, we obtain the information about the module and perform a more detailed analysis.
if this address is within a module range, we print its details to the console. if there is any symbolic variable or function-like definition at this address, we also print this symbolic data.
In the script we ran, we caught the RegisterNatives call in the unconditional branch line and obtained information such as offset and symbol name. Using this offset, we can catch the register natives calls and find the real address of executeVM. Let’s modify the script a little more.
Google replaced its long-standing integrity protection with the Safetynet infrastructure in 2024, with a new structure called PairIP. When you enter the Safetynet documentation page, you will see the warning “Warning: The SafetyNet Attestation API is deprecated and has been replaced by the Play Integrity API. Learn more.”
So what is this PairIP? What are the differences between it and Safetynet? Let’s take a look at this.
0x00: Safetynet Workflow
SafetyNet is a security mechanism that includes a virtual machine module called DroidGuard, which is part of the Google Mobile Services (GMS) package. This VM executes specific bytecode to analyze the device’s security status. The client application generates a nonce token, which is included in the attestation request sent via the Attestation API. The response from this API provides two parameters: ctsProfileMatch and basicIntegrity, which help assess the device’s compatibility and integrity.
This image is taken from Rhomain Thomas’ speech at the BH conference
CTS Profile Match: bootloader unlocked?, custom ROM?, uncertified device? etc..
Basic Integrity: is an emulator?, rooted device?, any agent injected? (frida etc..) etc..
At the end of the security checks performed by DroidGuard, a Protobuf message is generated. This message contains many parameters related to the device’s security checks. The ctsProfileMatch and basicIntegrity parameters mentioned above are also generated as a result of these checks. After all the checks are completed, Google’s backend issues a JWS token that includes all this data.
You can view the DroidGuard protobuf schematic here;
GmsCore/play-services-core-proto/src/main/proto/snet.proto at ad12bd5de4970a6607a18e37707fab9f444593a7 · microg/GmsCore
JWS token parameters in short, safetynet works like this:
SafetyNet’s Detection Logic
- Relies on two layers of checks:
- Quick and simple checks (e.g., detecting su binaries, checking SELinux status)
- More in-depth, resource-intensive checks performed by DroidGuard
- Runs a custom virtual machine (VM) that executes proprietary bytecode from Google
- Collects detailed security information (e.g., ROM status, bootloader state, injected agents)
- Prepares a Protobuf message summarizing the device’s security state
- The client application generates a nonce (unique token) and sends it, along with DroidGuard’s security data, to Google’s backend
- Google analyzes the data and determines ctsProfileMatch (checks for unlocked bootloader, custom ROMs, etc.) and basicIntegrity (detects emulators, root access, or code injection)
- After analysis, Google’s backend creates a JWS (JSON Web Signature) token containing all attestation results
- This token is not generated on the device but on Google’s servers, ensuring integrity and authenticity
0x01: PairIP Protection Workflow
PairIP has similar mechanisms to Safetynet as basic checks. It subjects your device to a security check by performing an integrity check on the device. However, unlike Safetynet, it does not require an additional Attestation or a different module.
PairIP basically uses a native library to perform integrity checks. This library separates some of the java codes in the project from their own lifecycle and allows them to be executed through the native library.
This library, called libpairipcore.so, is a powerful library that works on a VM basis and uses many anti-tampering techniques. It separates the java bytecodes in the project from the main structure of the project and converts them into bytecodes that will run in its own VM. Instead of running java bytecode directly in the project, some codes are run in this VM developed by Google via pairip’s executeVM() method.
bytecode files in assets/ folder.
These bytecode files in the assets/ folder in your application are converted into meaningful bytecodes by the VM and executed by the executeVM method. This is not a method defined in the executeVM native library. It is stored in JNI_OnLoad via RegisterNatives. and some method calls belonging to the library, important strings and many other things are created at runtime. So , if we want to do a complete analysis and examine the executeVM() method, we will first need to dump the library created at runtime.
So, how did we find the executeVM() method? Let’s take a closer look.
0x02: Introduction to Libpairipcore.so
The VMRunner class on the Java side is the main class that manages all the checks that PairIP performs within the application. This class manages all processes such as reading VM bytecodes from the assets/ folder and transferring the read bytecodes to the executeVM() method.
As can be seen, VM bytecodes are read with the readByteCode() method and then the read bytecode is transferred to the executeVM() method. When we look at the call tree of the invoke() method, we can see that there are many calls belonging to many packages.
PairIP splits the code into different parts by adapting the native code to its own VM structure and allows the calls to become more complex. The parameters we see in the invoke() call here correspond to the names of the bytecode files in the assets/ folder.
When we look at the codes, we see that the executeVM() method is defined on the native side. And when we examine the library from ghidra, we know that this method is not defined directly, but may have been registered via RegisterNatives.
If you want to take a look at the JNI_OnLoad method to follow the RegisterNatives call, you may not see a direct RegisterNatives call, but you may find some helpful hints.
When you examine it with Ghidra, we can see that there is a field in JNI_OnLoad where a method is defined. When we compare its parameter array with the values we get from Java, we can easily see that it matches the executeVM() method.
Therefore, the registration process of the executeVM() method may be taking place here. In that case, if we find the offset of the RegisterNatives call in the native library, we can reach the executeVM method by following this call.
Everyone can do this in different ways. In my own analysis process, I used Frida’s Stalker API to analyze the instructions more easily and speed up the patch process.
The operations we will do here will be as follows;
- Finding the offset address of the RegisterNatives call
- Finding the location of the executeVM() method in memory by hooking the offset found
- Dumping the real libpairipcore.so file modified in the runtime
- Analyzing the executeVM() call by examining the offset found in the dumped library.

we intercept the dlopen method to hook the libpairipcore.so file as soon as it is loaded and run the desired hook method as soon as the loaded library name is equal to the “libpairipcore.so” string.
| 1 2 3 4 5 6 7 8 9 10 11 12 13 14 15 16 17 18 19 20 21 22 23 24 25 26 27 28 29 30 31 32 33 34 35 36 37 38 39 | function startStalker(threadId, targetModule) { Stalker.follow(threadId, { transform: function (iterator) { var instruction; while ((instruction = iterator.next()) != null) { if (instruction.address <= targetModule.base.add(targetModule.size) && instruction.address >= targetModule.base) { var offset = instruction.address.sub(targetModule.base); console.log(`[+] ${offset}: ${instruction.toString()}`); iterator.putCallout(function (context) { console.log(` x8=${context.x8.toString(16)}`); console.log(` x0=${context.x0.toString(16)}`); var moduleDetails = Process.findModuleByAddress(context.x8); if (moduleDetails) { console.log(` Module: ${moduleDetails.name}`); console.log(` Base: ${moduleDetails.base}`); console.log(` Offset in module: 0x${context.x8.sub(moduleDetails.base).toString(16)}`); var symbol = DebugSymbol.fromAddress(context.x8); if (symbol && symbol.name && symbol.name.indexOf("0x") == -1) { console.log(` Symbol: ${symbol.name}`); } } }); } iterator.keep(); } } }); } function stopStalker(threadId) { Stalker.unfollow(threadId); Stalker.flush(); } |
We simply create our methods using the Stalker API. This structure provides a framework that allows us to intercept all instructions from the moment the application is started. Here we can do instruction-based filtering and hook only the instructions we want. However, seeing the entire flow at the beginning seems like the most logical way to go for me.
| 1 2 3 | if (instruction.mnemonic.startsWith('bl') || instruction.mnemonic.startsWith('b.')) { //other codes.. } |
Here, while the instructions are being loaded, we are monitoring the x8 and x0 registers in the same loop. The x0 register allows us to obtain the first parameter passing the function. The x8 register represents the branch target address. If the target offset belongs to a module, we obtain the information about the module and perform a more detailed analysis.
if this address is within a module range, we print its details to the console. if there is any symbolic variable or function-like definition at this address, we also print this symbolic data.
In the script we ran, we caught the RegisterNatives call in the unconditional branch line and obtained information such as offset and symbol name. Using this offset, we can catch the register natives calls and find the real address of executeVM. Let’s modify the script a little more.
| 1 2 3 4 5 6 7 8 9 10 11 12 13 14 15 16 17 18 19 20 21 22 23 24 25 26 27 28 29 30 31 32 33 34 35 36 37 38 39 40 41 42 43 44 45 46 47 48 49 50 51 52 53 54 55 56 57 58 59 60 61 62 63 64 65 66 67 68 69 70 71 72 73 74 75 76 77 78 | function hookNative() { const jniOnLoad = moduleHandle.findExportByName("JNI_OnLoad"); if (!jniOnLoad) { console.log("[-] JNI_OnLoad not found!"); return; } console.log("[+] JNI_OnLoad founded:", jniOnLoad); var hook3 = Interceptor.attach(jniOnLoad, { onEnter: function(args) { console.log("[+] JNI_OnLoad called"); console.log("JavaVM pointer:", args[0]); console.log("reserved:", args[1]); console.log("Backtrace:\n" + Thread.backtrace(this.context, Backtracer.ACCURATE) .map(DebugSymbol.fromAddress).join("\n")); startStalker(this.threadId, Process.getModuleByName('libpairipcore.so')); }, onLeave: function(retval) { console.log("[+] JNI_OnLoad return value:", retval); stopStalker(this.threadId); hook3.detach(); } }); const moduleHandle = Process.findModuleByName('libpairipcore.so'); if (!moduleHandle) { console.log("[-] libpairipcore.so not found!"); return; } const registerNativesOffset = moduleHandle.base.add(0x6a3b4); Interceptor.attach(registerNativesOffset, { onEnter: function(args) { console.log("[+] RegisterNatives called"); console.log(" JNIEnv*:", this.context.x0); console.log(" jclass:", this.context.x1); console.log(" JNINativeMethod*:", this.context.x2); console.log(" nMethods:", this.context.x3); const nMethods = this.context.x3.toInt32(); const methods = this.context.x2; for(let i = 0; i < nMethods; i++) { const methodInfo = methods.add(i * Process.pointerSize * 3); const name = methodInfo.readPointer().readCString(); const sig = methodInfo.add(Process.pointerSize).readPointer().readCString(); const fnPtr = methodInfo.add(Process.pointerSize * 2).readPointer(); const ghidraOffset = ptr(fnPtr).sub(moduleHandle.base).add(0x00100000); console.log(` Method[${i}]:`); console.log(` name: ${name}`); console.log(` signature: ${sig}`); console.log(` fnPtr: ${fnPtr}`); console.log(` ghidraOffset: ${ghidraOffset}`); console.log(` Ghidra offset: 0x${ghidraOffset.toString(16)}`); console.log(`[+] ${name} function's memory dump:`); const dumpSize = 128; const dumpData = Memory.readByteArray(fnPtr, dumpSize); console.log(hexdump(dumpData, { offset: 0, length: dumpSize, header: true, ansi: false })); } }, onLeave: function(retval) { console.log("[+] RegisterNatives finished, return value is:", retval); } }); } |
